Olympus Trip35 and Metz Mecablitz 38CT3 Flash Unit

Olympus Trip35 and Metz Mecablitz 38CT3 Flash Unit – a perfect match. By Ray Goulter

When I wrote about the Olympus Trip35 back in Camera Clips November 2018, I stated the following:

“The Metz 38 CT3 is also a gem of a flash unit ideally suited for coupling to the Trip 35 so maybe I’ll do a report on it at a later date.”

Now is the time for that report, albeit a little later coming than I originally envisaged.

The Metz Mecablitz 38CT3, introduced in 1976, is 19cm tall, 11.5cm wide and 7cm deep not counting the camera-fixing base arm, so it’s not as compact as a small flash unit when space is a factor when travelling, but it’s still compact enough that, allowing for its characteristics well above simple hot-shoe mounted flash units, makes it ideal for the travelling photographer. Notwithstanding, it’s much more compact than many specialist flash units, both after-market and proprietary units. It weighs in at 600g without the 4 AA batteries, so weighs more than the Trip35’s total 400g. Total weight of camera plus flash is a neat and manageable 1kg, the same as the weight of a single 90mm lens for a Mamiya RB67, Rollei 6006 and Hasselblad!

The base arm of the 38CT3 is 20cm long and 3.5cm wide set at right angles to the main flash body but a screw underneath allows it to be removed to reduce bulk when travelling. Alternatively pack it into the corner of a suitcase, camera case/bag or backpack. This same screw when loosened allows the base arm to be extended to reduce the risk of red-eye. This is something small flash units placed on a hot-shoe can’t do. This problem with small flash units can only be fixed by using a flash extension cord coupled to a Prontor-Compur sync connector nipple on the flash unit (if it has one) and connected to the standard Prontor-Compur sync connector nipple on most film cameras. The downfall of most small lightweight flash units is their inability to adequately illuminate subjects more than a couple of metres away. Using the 38CT3 with ISO 100 film gives illumination up to about 38 feet (roughly 13 metres) at f/2.8, the Trip35’s widest aperture, on manual full discharge setting. This is enough for a group of friends or relatives in a room where the walls and ceiling give average reflectance and will bounce-reflect the flash discharge.

Manufacturers of flash units calculate Guide Numbers (GN) for internal use. The flash-to-subject distance in the open at night requires greater power from the flash. In the case of 100ISO film you would need to set the flash to 50 ISO to double (1 stop) the intensity of the flash, or ISO 25 to quadruple (2 stops) the flash intensity depending on camera to subject distance. The settings in the case of this essay will be according to the automatic settings where the flash adjusts discharge based on reflected illumination inside a room.

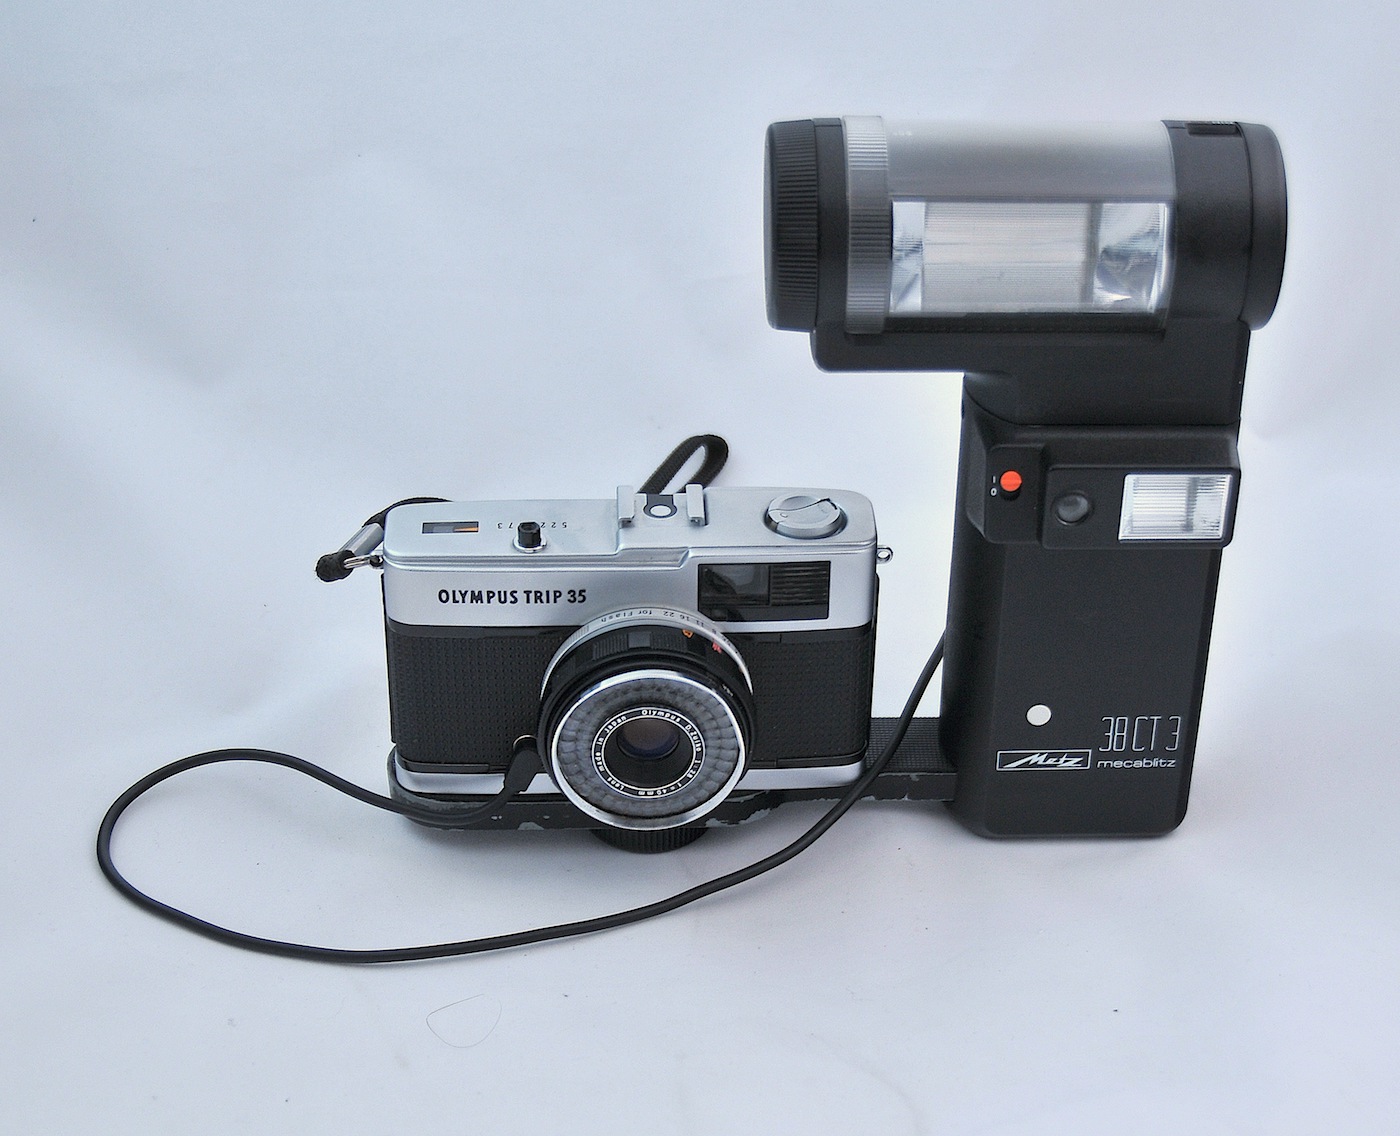
The Trip35 positioned closest to the flash unit. The flash head position closest to the lens runs the risk of red-eye, and a compact flash unit mounted on the hot-shoe would almost certainly cause red-eye, especially in dimly lit conditions. Note the Mecablitz 38CT3 also incorporates a fill-flash, enabled by moving the red button beside it to the “on” setting. The flash head can also be swivelled 90 degrees left and right to give bounce-flash off a wall, as well as vertical rotation providing bounce-flash off a ceiling.

The next image shows the preferred positioning of the camera and flash unit to avoid red-eye. A flash extension cord would allow the flash to be positioned well away from the camera if need be.

The next image shows the flash head rotated 90 degrees vertically. The head can be rotated to any desired position from 0 degrees to 90 degrees, but there are two click stops at 60 degrees and 90 degrees. The use of a reflector when the unit is rotated 90 degrees vertically would soften the intensity of the flash if a single flash was used for portraiture.

There’s also a wide flash adapter that’s brought into position by rotating a built-in clear plastic cylinder. The following image shows this screen turned to its effective position. This would be very handy photographing a larger group of people, considering the Trip35’s fixed 40mm lens.

The speed of the film is set using the dial to the left, indicated in both DIN and ISO (ASA). This is viewed looking directly down at the flash. The settings range from 50 ISO to 1,000 ISO. In its time this would cover the majority of film types.

So why do I think this flash unit is an ideal partner to the Olympus Trip35 camera?

The answer lies in the relative settings of both the Trip35 and the 38CT3, plus the ease at which both are quickly selected. The next image clearly shows four output settings on the 38CT3:

•           0.5 – 4.5 metres (green button),

•           0.8 – 7 metres (red button),

•           1 – 9 metres (yellow button), and

•           W for Weak

The Trip35, similarly, has four click-stop distance settings on its lens barrel: 1 metre, 1.5 metres, 3 metres, and infinity. It can be seen that the first three of these click-stop settings corresponds closely with the 38CT3 settings.

Let’s assume we have a subject 1 metre from the camera in a dimly-lit setting. We set the camera on the first click-stop of 1 metre as per the following image.

Normal lighting being too dim dictates flash is needed. The following text indicates settings for ISO 100.

When the left (green) button of the 38CT3 is pressed, the green indicator light illuminates on the flash head barrel, indicating f/8. This f-stop would change if a different ISO is selected.

It’s then a simple case of setting the camera’s aperture ring to f/8, and shoot. Note the image below shows f/11, for illustrative purposes only.

The next camera click-stop is for 1.5 metres, for several people or a subject at that distance. The second (red) button from the left on the 38CT3 is pressed, and the red indicator light indicates f/5.6. Select f/5.6 on the Trip 35.

The Trip35’s click-stop of 3 metres is next. The third (yellow) button from the left on the 38CT3 is pressed, and the yellow light illuminates for f/4. Select this on the Trip35 and once again we’re ready to shoot a group of people at the Trip35’s 3 metre setting.

The final button on the Metz is “W”, for “Weak”. Selecting this changes the 38CT3 to Manual mode, where the aperture to be set is selected from the calculator on the left side of the flash head barrel. This setting provides a weak flash output for use when full flash illumination isn’t wanted, such as for providing illumination to someone’s face under a hat in direct sunshine, where detail is needed in the shadow area.

There’s also a full discharge manual capability. Move the On/Off button to the far right then back to the “On” position to cancel any auto setting. Read off the aperture for the specific distance as per the scale, and set the Trip35’s aperture ring to the relevant setting and shoot.

Results:

The following images were taken using the Trip35 and Ilford FP4 35mm film, using the various settings for the different subject distances from the camera. I had to develop the film, make prints, and photograph the prints using the Nikon D300 to get these digital files.

I selected our dog Gus as my model for this photo shoot.

Note these examples were not taken for photographic excellence but simply for illustrative purposes.

For Image_1 following, the Trip 35 was set to lens focus click-stop 1 metre, the green button on the Metz selected, and my position about a metre from where Gus was lying on his cushion. It can be seen the exposure is well within acceptable limits. I took a low position and was slightly off in my camera to face distance, so Gus’ head is a little softly focussed. Even so I’m satisfied the overall exposure was correct.

The next image was taken with the Trip 35 lens at focus click-stop 1.5 metres and the Metz red button pressed. Once again it can be seen the combination has properly exposed the subject. The flash head, being offset as per the second image at the beginning of this article, has avoided red-eye, or in the case of dogs, blue-eye.

The final example is the result of the Trip 35’s lens focus click-stop at 3 metres and the Metz yellow button selected. This distance would accommodate the majority of groups of people being photographed. Gus, by this time, had migrated to the lounge, this being one of his favourite sleeping places. The tonal range in this image is very acceptable with good detail in the leather of the lounge and no harsh burnt-out light areas such as the wall behind the lounge.

The final image is an enlargement of Gus from the second image taken at 1.5 metres. Once again I’m impressed with the sharpness of the 40mm lens on the Trip 35, which, as I mentioned in my article on this little gem of a film camera, is comparable to the Leica equivalent. I’ve deliberately left it as a larger image to show, even with this amount of enlargement, the hair detail. There has been some softening of detail in the conversion from the print to digital but even so the amount of detail in the negative is clearly evident.

Film used was 35mm Ilford FP4+ developed as normal for 100ISO film speed in Ilford ID11 developer. The first three photos of Gus were exposed using a Durst M300 35mm enlarger and Nikon 50mm enlarging lens at f/8 for 8 seconds, filter grade 3, with the lens 24.5cm above the enlarging baseboard printed on Agfa Rapitone RC multigrade paper developed in Ilford Multigrade developer. The final enlargement had the lens to baseboard distance at 59cm, still at f/8 and exposure extended to 32 seconds, still using filter grade 3.

CONCLUSION:

The coupling of the Olympus Trip35 camera with the Metz 38CT3 remains, in my opinion, one of the best combinations of a 35mm film camera with a specialist non-proprietary flash unit, and an ideal combination for taking on holidays where space and/or weight is a factor. Even today, with renewed interest in film, this is a combination a young backpacker should consider. The battery-less and electronics-free automatic exposure system of the Trip 35 with its brilliant 40mm lens and the closeness of the camera’s focus click-stops to the Metz 38CT3’s flash settings provides the photographer with a very quick and easy means of ensuring correct flash illumination with a much-reduced risk of over or under exposure.

What really puzzles me is why the Metz Mecablitz 38CT3, with its extendable camera arm, swivel head, quickly selectable ISO and distance flash ranges, built-in fill-flash, built-in wide-flash adaptor, and up to 90 degree vertical rotation of the flash head wasn’t more popular following its introduction in 1976. It can also be coupled to a range of cameras for TTL flash exposure using a dedicated SCA connector cord. It would therefore have been the ideal accompaniment to a wide range of 35mm cameras.

Ray Goulter

Posted in Uncategorized | Leave a comment

In the Loft Yesterday. Mark Pedlar

Lofts are marvellous places – rarely visited but frequently containing hidden treasures waiting to be rediscovered. It happened yesterday. I’d been in the loft looking for childhood possessions of an adult son. A wave of nostalgia having prompted a request for their return.

In the search I came upon this – my second camera and an introduction to colour slide photography. In 1958 at the age of 12 I bought my first camera – a Kodak Brownie 127. Its 8 4x6cm images on roll film, black and white of course, were magic. Relatively soon after this my mum, a very keen gardener and flower show competitor, bought herself a Voigtlander 35mm viewfinder camera. Her images were much more exciting. They were in colour. You got 20 images on a roll. AND you could project them on a screen several feet wide for all to see. However, cameras cost money, which I didn’t have.

My Brother 1961

In the English summer of 1961, I was just shy of 15 – the legal age for full time work. However, I managed to get a holiday job for 2 weeks in a business that raised chickens for both eggs and meat. My job was to pack the eggs collected from the battery houses into square trays when they’d been candled (to see if there was a chick in side) and sorted by weight. They also got stamped with a little lion to show they were GOOD BRITISH eggs. In 2 weeks, I had earned about £8 – something like $17.

This Halina 35X cost me all my wages – £7 13s 4d. It set me off on a 50 year association with 35mm colour slide photography. Kodachrome 25 came in 20 and 36 exposure cassettes. I couldn’t afford the 36 exposure ones. However, the cost of the film also covered processing. You just had to wait a couple of weeks for the images to come back from Kodak in their distinctive yellow box.

The camera has a viewfinder but no rangefinder function. You estimate your distance to subject and dial it in on the second lens ring. The first ring gives shutter speeds – 25-200sec. There’s also a bulb setting for time exposures. Underneath there is a tripod fitting to aid the time exposures. The third lens ring carries aperture settings from F3.5 – 16.

Jenny January 1965

Since there is no light meter installed you either use a hand-held light meter or rely on Mr Kodak. For those too young to recall such things, the box in which your film was packed for purchase had a handy guide on the side explaining what exposure settings – F stop and shutter speed – would be best for different lighting conditions – bright sun, cloudy bright, overcast and dull. Mostly that worked very well.

This camera served me very well for around 8 years and then I ventured into SLRs – at the Praktika level, not Nikon.

One other feature of this little gem is a stamp on the underside of the body. It says – Empire Made.

Halina was also Hanimex, an Australian company. There may be other Australian made cameras but I don’t know of any.

Posted in Uncategorized | Leave a comment

Top Images 2020

This article is not about winners. It’s about the best images of everyone who entered the 2020 Annual competition.

You know I have always felt uneasy that we celebrate just a handful of images at the end of the year. Yes credit should go to the respective winners, however I believe that everyone is entering their best work for 2020 and I have wanted to make that the focus for this article. Well done everyone. This is the place to celebrate your achievements for this year.

I will post 1 image for every entrant. If possible I would love to publish your comments about your image. Why did you take it, how did you take it and why enter it into the competition. I will update this post as I get more replies.

Well lets make a start; In alphabetical order;

David Hancock: Andy

David Hope: Maya in Grandmas christening dress

Di Gage: Had better Days

Duart McLean Vivid Bridge

Frances Allan Surfing Pondalowie

Date taken: December 4 2018 5:30 PM
1/800 sec, f/6.3 600mm
ISO 320
NIKON D7000

Why a surfer?  I grew up addicted to Gidget movies.  I progressed to the music Tubular Bells by Mike Oldfield.  Due to lack of coordination I was never able to surf but love sitting on the beach watching surfers in action.  This was taken on a perfect summer’s day at Pondolowie Bay, Innes National Park.  The conditions were perfect for wave formation.  The photo reminds me of the freedom and exhilaration that I imagine this guy was experiencing.   The surfer’s didn’t mind us taking their photos.  In fact, they were so pumped that when we ate at the Marion Bay pub afterwards several of them came up and chatted to us. 

Gordon Lindqvist: Making a Splash

Greg Sara: Doing the Teliqua Tango

Heather Connolly: Historic Pub

Helen Whitford: Feather

James Allan: Last Light on Rawnsley Bluff

TECHNICAL DETAILS:
Camera:
Nikon D7000,
Lens:
Nikon 18-200 set at 35mm
ISO 400,
Aperture: f13
(Program Aperture priority)
Shutter: 1/15sec  hand held + image stabilisation
Location:
Rawmsley Park station Flinders Rangers (Between Hawker and Wilpena) September 2020.

Post Processing: Stitched Panorama – 3 images stitched in Photoshop and cropped to taste.

We had had extensive rain overnight and most of the day. I went for a walk to the dam, now swollen with the rain in the late afternoon. From where I stood, the sun had set, but the last rays were hitting the top of the Wilpena range and the surrounding rain clouds. The light was not going to last long and so I walked quickly to find this spot where I could capture the range and hopefully some reflection in the lake. Unfortunately a light breeze ruffled the water in the middle of the lake, but I got a better reflection in the shallow water. I increased the amount of reflection by squatting down and shooting from a low angle. I took 3 shots with the intention of making a stitched panorama.

The image was a little dark and I felt it was important to rescue some details from the dark areas by using the Photoshop RAW import dialog, increasing the Shadow slider. (Not too much so I would not lose the impact of the dramatic lighting)

Jenny Pedlar: King Penguins

Judy Sara: Blue Skimmer

Mark Pedlar: I Beg Your Pardon

Camera – Panasonic Z2500
Aperture – F4.5
Shutter Speed 1/1000sec
ISO 400
Date: 12/3/2020
Location: St Andrews Beach, South Georgia.

Story:

Jenny and I were 2 weeks into a 3-week tour of Antarctica, South Georgia and the Falklands. We had landed on St Andrews beach, the home of 500,000 breeding King Penguins. Just inland of the beach there were also colonies of fur seals. This is a friendly interaction between members of the two groups of inhabitants.

Just behind me at this moment the beach between me and the surf is packed with half a million King Penguins; mainly adults like these but some juveniles still sporting their dusky chocolate brown plumage. 

Some base rules of the cruise defined just how close we were allowed to get to the wildlife. No closer than 5m. Unfortunately, the wildlife hadn’t been told this, and being inquisitive, came close enough to peck at my camera. It is difficult to get a good idea of scale from this image but those birds stand thigh high to a man. So, they are quite able to reach up to the camera hanging at waist level.

Technical:

The camera was bought specifically for this trip. I wanted one machine that would easily capture both stills and video. I had tried the same dual-purpose system in the past with a Canon EOS but found the camera frequently hunted for focus while shooting video. Also, it was necessary to view video shoots only through the LCD. This made it very difficult to see what was being shot in bright conditions. The Panasonic, by contrast, has a digital viewfinder. Changes between stills and video can be made without losing sight of the subject.

I chose to sacrifice interchangeable lenses and true macro for 40x zoom, reasonable macro and excellent video in one camera. I was not disappointed. I now use the Panasonic for the vast majority of what I shoot.

Meredith Retallack: My Favourite Food

Paul Hughes: After the Rains

Canon 6d with 24-105 f4L lens@82mm. 1/400sec @ f7.1, ISO 100

This was taken at the end of October last year, after heavy rains had encouraged growth. We went on a walk with an Aboriginal guide who took us into an area of Wilpena Pound which has a number of old abandoned buildings.  This one is (or was) the smithy. Very minor adjustments in Lightroom. The Salvation Jane (or Patterson’s Curse – depends if you’re a half-full or a half-empty type) was everywhere, sometimes looking like an English bluebell wood, an effect I liked.

Ray Goulter: Converging on ETSA

Sam Savage: Any Tree will Do

Sheila Gatehouse: Hazy Sunset

Steve Wallace: Ever Watchful

TECHNICAL DETAILS:
Pentax K20D,
Pentax 55 – 300 mm lens at 300mm (450 effective),
ISO 400,
Apperture: f5.8
Shutter
; at a surprisingly slow 1/25Sec. (testament to the effectiveness of in camera stabilisation).
Location:
Waterton Lakes was amongst of our favourite days of our 8 weeks in Alaska and British Columbia and Alberta and is highly recommended.

The deer which is the subject in my annual entry, “Ever Watchful”, was captured in Crandell Campground in Waterton Lakes National Park in Alberta Canada in June of 2008. The campground consisted of a ring road from which the campsites radiated with a central area of original forest left largely intact and the deer felt secure enough to enter and feed in this area. I realised the deer was there just after we arrived in the late afternoon and went “hunting” for it with my camera fitted with a 55 – 300mm lens which on my APSc sensor translates to 82 – 450mm. I took 5 shots of which the first was the best as the deer became aware of my presence.

Suzie Smith: Pink Robin

Posted in Uncategorized | Leave a comment

October 2020 Camera Clips

This image has an empty alt attribute; its file name is character-banner.jpg

The banner this week is a montage of what I considered were the great character portraits from the recent competition. The Authors were, Frances Allan (1&3), Shiela Gatehouse (2&4), Helen Whitford (5) and Steve Wallace (6). I chose these images because of their unwavering gaze. I was not the judge, but there would be several 10’s in this collection if I was.

This image has an empty alt attribute; its file name is product-photography-banner.jpg

The alternate (second) Banner comes from Vicki Crammer from the product photography competition with a strong image called the handbag. Of course all of the original images and a write up of the competition can be found on the club web page.

It is time to choose your favourite images for judging. The end of year competition looms. Of course this year the competition is only projected images, with 2 categories, colour and monochrome. In addition there are 3 special prizes, one for Landscape, one for Portrait and one for Wildlife. Entries are due in early November, refer to the wabpage.

This month I have articles from Mark Pedlar (A photo journal of his Antarctic holiday) and Ray Goulter (Baby Brownie Camera). To that I have added a write up of another photographic location in South Australia, the Paiwalla wetland near Murray Bridge.

So this month I am going to start a new feature. As there is a lot of trial and error in photography, I have decided to look at the problem solving aspect of capturing an image. This week I will pose a problem and once you feel you have the answer, have a look at the answer page. Best of Luck.

Enjoy this edition of Camera Clips.

James Allan

Post script:

There is a change of format this week. Word Press has updated it’s editor and I can no longer nest the pages within each months newsletter. Accordingly I have made each of the articles a post on the home page. However you can navigate to the articles in the usual way from the table of contents below.

Contents:

Posted in Uncategorized | 1 Comment

Problem of the week

This image has an empty alt attribute; its file name is impressions-on-a-frog.jpg

Have you ever taken a photo and looked at the view finder and thought “what is wrong with that shot?” I thought I’d done everything right. So what do you think?

It helps to take a step back and ask, what were you trying to do? It was about 9pm at night. There was a frog on the kitchen window and I wanted to take a picture with the off camera flash. The image was sharply focussed, the flash fired, and yet still I have this blurred image. What went wrong?

Posted in Camera Technique | 3 Comments

Antarctica 2020 – Mark Pedlar

What does the holiday of a lifetime look like? – Like this!

26th Feb. Jenny and I flew to Santiago, Chile for a few days with friends before going south to Ushuaia at the bottom end of Argentina.  Ushuaia is the world’s southernmost city and the jumping off point for a trip to Antarctica. From 2nd March for just over 2 weeks we became David Attenborough.  

From our icebreaker/cruise ship (just 190 passengers) we visited Barrientos in the Aitcho complex and the Antarctic Peninsula. Landing from Zodiacs we walked among Gentoo and Chinstrap penguins We saw icebergs large (the size of KI) and small. We saw whales blowing but not close to, at least 4 species of seals and half a dozen species of penguins. How about standing on a beach in the middle of half a million King Penguins?

Then stories of Covid being associated with cruise ships reached the far south Atlantic. The one inhabited spot on South Georgia refused us landing. We were uninfected but they were not prepared to take the risk. No worries, we just headed off for our next scheduled stop – the Falklands. Another refusal. At this point, having seen 90% of the intended locations we set course for our disembarkation port, Puerto Madryn about half way up Argentina.  Also, no admittance. Ushuaia our port of origin refused our requests to return.

We steamed north to the River Plate estuary intending to land at Buenos Aires and connect with a charter flight home. Standard flights were being cancelled wholesale across the world and many airports were already closed. We remained off-shore for 4 days and were eventually refused entry. Fortunately, Montevideo, Uruguay across the estuary allowed us to come alongside. 9 days later after finding flights home for all non-ANZ passengers the remaining 133 of us boarded our chartered Boeing 787 wide bodied jet – Montevideo – Santiago, Santiago – Sydney. How often do you become part of a 133-person consortium that buys a 260-seater jet for the day! Don’t ask about the money!                   

Then two weeks in Sydney isolated to one room, meals left at the door. Followed by 14 days isolation here at home. Final release from incarceration 1st May.

Holiday of a lifetime? Absolutely! The final 6 weeks I don’t need to go through again!

Posted in Travel, Uncategorized | Tagged | 2 Comments

Paiwalla Wetland – James Allan

Peregrine Falcon landing in a dead tree near it’s nest at Paiwalla

It was 2014, a few years ago, when I was introduced to the joys of Paiwalla Wetland by my friend and bird photographer Les Peters. The former dairy farm between Murray Bridge and Mannum has been returned to wetland swamps and lagoons. It is an ideal location for waterbirds, and the soaring cliffs are a home to several species of raptors. It receives no federal funding, being privately owned, and is maintained by an army of volunteers.

If you wish to visit you should go to the webpage and write a message to the manager stating your intention. You will be asked to leave a donation in the metal box in the parking area. Generally they are more than happy for photographers to visit.

After leaving Murray Bridge on the Eastern side of the river start on the road to Karoonda, but after several kilometres take the left hand turn to Bow River and Mannum. After passing the Burdett Hall keep an eye out for Lagoon road that leads to the cliff top entrance, or drive on to the next road, and at the bottom the hill turn left through the gate to travel downstream next to the river until you arrive at the car park.

I usually walk anticlockwise around the embankments that surround the managed ponds. Keep an eye out for water birds in the ponds as well as smaller birds like wrens in the trees that surround the ponds. There is a hide you can walk out to, and several seats where you can stop and watch. Take care of the plentiful tiger and black snakes that enjoy sunning themselves in the tall grass. Generally they are not aggressive and will move away if you stop at a cautious distance and wait.

Below is a collection of birds you may see.

Along the cliffs are Black and Whistling Kites. They float effortlessly through the air with just a flick of their tail, or wing tip to change direction. The Black kites are more numerous, slightly smaller and have a square tail. The Whistling kites are easy to identify by their distinctive descending whistle.

Black and Whistling Kite

Of course when I get to the cliffs I am watching out for the pair of Peregrine Falcons that nest in the cliffs near a fallen boulder. They are smaller and more compact than either of the kites. However they usually see me first and start buzzing me angrily. They don’t soar, they beat their short rounded wings frantically. Do you know how fast they fly? It’s not an easy shot, especially with a bright sky behind. We usually don’t stay long, not wanting to stress them too much. However they are a majestic bird none the less.

Angry bird buzzes around my head

If you enjoy bird watching, I would recommend the drive out to Paiwalla. Take some water and a snack as you will probably be there for several hours.

“Paiwalla Swamp is my magical place,
When I visit there it puts a smile on my face.
I could arrive loaded down with worry or care,
But it soon diminished when got there
With flights of birds passing by
My trouble and strife also seemed to fly

The breezes that blow through the eucalyptus trees,
Seem to bring ones troubles to their knees
It is so easy in nature yourself to lose,
As over the sound of birds and frogs you muse
Do the migrating birds feel the same,
And is that the reason why it is here they
came

What spirits in those ancient cliffs dwell,
And how many stories could they tell?
Are the secrets kept by a resident wise old owl,
Or are they in the care of one of those waterfowl?
Maybe the soaring raptor or wriggling snake knows them all
Or are they even broadcast in a lapwings call?

Could you learn them from a gliding nocturnal bat,
Open a swimming displaying water rat?
One of the things about Paiwalla that I do know
Is that it is a place where I love to go
This area whose name means the right arm,
For me has got its own endearing and enduring charm”

Bill Mountain, Friend of Paiwalla

Poem by Bill Mountain, mounted on a post near one of the observation points.
Posted in Uncategorized | 2 Comments

Answer to the Problem of the Week

This is the photograph that I had intended to take. (Sorry I just noticed a little bit of border added with a hard edged vignette). The frog is sharp and well lit. The window is dark.

The answer to the problem was the flash settings. The camera has a range of settings, but the one in question is the “rear curtain flash”.

Normally the flash will fire at the same time as the shutter opens (front curtain) and the camera adjusts the intensity of the flash with it’s TTL software so that the image is correctly exposed. The shutter can be open for a longer period if desired to allow some ambient light, but usually the image is well lit by the flash.

With rear curtain flash the camera will take the picture first, adjusting the exposure for the light settings and then when it has finished and the curtain closes, the flash will fire. In this instance if the exposure has been achieved already the flash will add little to the overall exposure. This is what happened with my first image. Because it was very dark the shutter was open for a long time causing a blurred image, over the top of which is a faint very sharp image created when the flash fired.

I corrected this by switching back to the usual setting of front curtain flash. Alternatively I could have switched to fully manual mode and stopped down the exposure, giving more for the flash to do.

Actually I do wonder if the “bad” first image, which was a mistake, may actually be more interesting than the intended image. A good lesson in not throwing out your mistakes.

So the question remains, if the rear curtain flash can mess up your image, why is it there? How do you control it to get the picture you want?

Shutter Drag

The reason for having rear curtain flash is to create the effect sometime known as “shutter drag”. If we use a long exposure and fire the flash at the beginning we can get faint motion blur emanating from a moving object as if it was travelling backwards. If we want to create the illusion of foreword motion we need to fire the flash at the end of the long exposure. (The rear curtain)

Posted in Camera Technique | 2 Comments

COLLECTORS’ CORNER – THE KODAK “BABY BROWNIE” CAMERA

By Ray Goulter

The “Baby Brownie”, unlike it’s big brother the ubiquitous Box Brownie, is a relatively uncommon film camera of simple operation.

It’s a diminutive camera measuring 78mm wide, 66mm high and 72mm front to rear, constructed of Bakelite. It was manufactured by Kodak in the USA from 1934 to 1941, thus covering the WW2 years, discontinued, then manufactured a second time in the UK from 1948 to 1952. The reasons for its second period of manufacture I feel to be its continued appeal as a cheap, easy-to-use, no-frills, point-and-shoot camera for those people not wanting or needing a more complicated camera.

When I say it’s a simple camera, I really mean “simple”. It’s essentially a box into which 127 rollfilm is inserted, with a fixed 60mm lens, fixed f/16 aperture and 1/50th sec fixed shutter speed. Most Box Brownie cameras, apart from the early ones, had a connection for flash as well as the ability to move a slide where the aperture could be changed. Some Box Brownies had a sliding yellow “cloud” filter. Maybe the Baby Brownie was a camera that was deliberately uncomplicated and was an early type of the “just point and shoot” philosophy. It appears it may have initially been aimed by Kodak at the “fairer sex”, but became a favoured camera for many soldiers during WW2 due to its relatively small size and low weight of 185g (empty). Rolls of 127 film were also much smaller than the 120 counterpart. It therefore fitted into a soldier’s kit bag quite easily, taking roughly half the space of the Box Brownie 120 rollfilm camera, and more rolls of film could be carried around in the kit bag.

Styling is art deco, a further indication this little camera was aimed at the female consumer. Its size meant it could easily be carried in a lady’s handbag and whipped out to take a photo when needed.

This image has an empty alt attribute; its file name is kodak-baby-brownie-1.jpg

The shutter is a simple “rotary” spring-loaded piece of thin flat metal, triggered when the shutter lever is pushed sideways. The shutter lever can be seen at the bottom front of the camera in the preceding image. There’s no double-exposure lock, so every time the shutter lever is actioned a fresh exposure takes place whether the film has been advanced or not. I wonder how many double-exposures resulted from accidental shutter release or when the film wasn’t wound onto the next frame? Film advance is actioned by turning the knurled knob until the next frame number appears in the window at the rear of the camera. It stands to reason the film is spooled similar to 120 and 220 rollfilm, with backing paper printed with frame numbers visible in the rear window.

There’s no internal viewfinder. The subject is composed using the flip-up finder located at the rear upper section of the camera body. Some cameras using this style of viewfinder refer to it as a “sports” finder. This next image shows the rear of the camera with the frame number window and the viewfinder flipped up.

This image has an empty alt attribute; its file name is kodak-baby-brownie-2.jpg

Loading film is also simple. A spring-loaded latch at the base of the camera, when pushed across, releases the internal frame onto which the film is loaded then the frame reinserted into the camera. The system of having a film carriage body separating from the main body of the camera is similar to that used for some Leicas and the first Nikonos (Nikon) underwater camera, with the major difference being the film insert of the Baby Brownie is top-loaded. What it means for this little camera is there is no hinged rear plate; thus no moving parts needed in order to load/unload the film. Simplicity is the key feature. An offset cam inside the camera base is used to secure the insert when it’s pushed into the camera body.

There are only two levers: one operates the offset-cam to secure the insert when repositioned into the camera after loading/unloading the film, and the other is used to trigger the shutter.

This next image shows both the shutter lever at the front of the camera body and the insert locking lever in its closed position at the base.

This image has an empty alt attribute; its file name is kodak-baby-brownie-3.jpg

I thought at first there may be a risk of the insert securing lever being accidently moved, resulting in the insert separating from the body thus fogging a section of the film but the cam, provided the lever is pushed fully home, requires more pressure to open than what is required for it to be accidentally disengaged. A further feature to reduce this risk is the rebated section holding the locking lever.

This next image shows how turning the locking lever to the open position releases the top-loading insert that holds the film transport.

This image has an empty alt attribute; its file name is kodak-baby-brownie-4.jpg

Accidentally exposing the film by the shutter being inadvertently triggered is a definite risk. Whilst the shutter does require reasonably firm pressure, the force needed is not overly strong so it’s possible the camera, when transported in a handbag, soldier’s kit bag or some other bag, may press against some other object that triggers the shutter.

What is somewhat unusual is the film path within the camera. The lens is constructed such that its focal plane is curved. The film carriage is likewise curved rather than being dead flat like most film cameras.

The next image shows the insert fully removed from the camera. Note the curvature of the film transport plane at the bottom of the insert. Focus of the lens is from approximately 10 feet to infinity. A copy of the instructions I found on the Internet indicates Kodak could supply a closer-focus attachment for the lens that allowed portraits of a subject about 3 ½ feet from the camera. I expect these attachments would now be extremely rare.

This image has an empty alt attribute; its file name is kodak-baby-brownie-5.jpg

The insert shows the take-up spool in position. 127 rollfilm is still manufactured but in rather small quantities. Some owners of 127 rollfilm cameras cut 120 rollfilm down to 127 size and attach to 127 spools. I could do this but I need another 127 spool that I don’t have. I’ll check some camera stores to see if they stock any 127 b&w rollfilm and if so I’m inclined to run a roll through this interesting little camera.

There’s no threaded hole at the base to attach to a tripod, so this camera is meant to be hand-held. The astute photographer would be best to place it on a firm surface to minimise camera shake. Images I located on the internet show the lens to be reasonably sharp and not exhibiting the soft focus many similar cheap fixed-focus lenses tend to show.

Given the apparent initial female target audience, this camera was designed to allow photographs to be taken indoors providing the lighting wasn’t too dim, without resorting to flash. The ideal conditions for outside photos would be an overcast day where the lighting wasn’t too intense, using 100 to 125 ISO film. Bright sunshine would result in overexposed negatives, but, having said that, colour negative and monochrome negative film can handle a fair degree of overexposure that can be adjusted in the final prints. Underexposure indoors would definitely present a problem with lack of detail in shadow areas as well as lack of contrast.

There’s not a big choice in 127 size films now and the choice of 127 films was never extensive but this camera is not what you’d call “high-end”. When the limited set controls of this camera are taken into consideration the higher speed films like 400 ISO would, I feel, be the better option for photos to be taken indoors but bright sunny days outdoors would then result in very over-exposed images.

The target consumer would be someone who wanted an easily-transported simple-to-use no-frills camera without flash where no consideration needed to be given to adjustment controls to suit the ambient lighting conditions – just a simple “point and shoot” camera. Perhaps the very model name of this camera gives an indication of what Kodak apparently expected would be their initial target consumer: mothers taking photographs of babies and children in reasonably well-lit indoor rooms.

Conclusion: A very easy-to-use early “point and shoot” style camera requiring little effort or photographic knowledge by the operator. There’s no means of adjusting the shutter or the aperture and no means for adjusting focus. Just make sure the film is loaded and the film wound on to the next frame for the next shot. It’s as simple as a camera can be and even a pinhole camera would require more effort to operate.

Ray Goulter

Posted in Uncategorized, Vintage Cameras | 2 Comments

The August 2020 edition – wind, letters and Numbers.

Southern CrossWindmill Banner

Yes both the wind power, and the letters and number competitions took place in the last month.  The Banner above comes from the wind powered competition.  In this edition of camera clips we also have a write up of Howard Seaman’s workshop, 3 of the travelogue topics; Pildappa rocksRogues point and The Lavender trail and an explanation of Community judging.  The answers are not blowing in the wind, they are buzzing in the ether.  So check out this months edition of Camera Clips.

James Allan

Posted in Newsletter announcement | Tagged | Leave a comment